Workflow Guide
Omnitracs (Qualcomm) Workflow Dispatch/ Trip Process
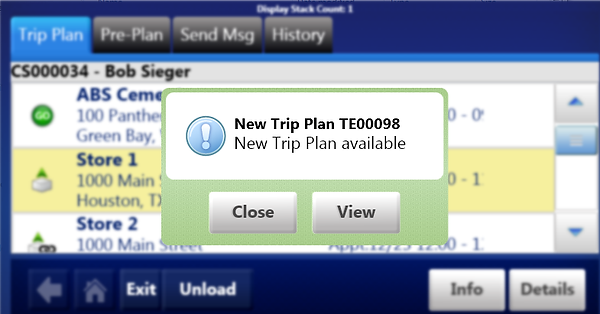
An Alert displays on the Omnitracs unit screen when a new Trip Plan is available.
Additionally, the Display’s ALERT MANAGER Indicator will light up (an Exclamation Point at the top of your screen) when a new Dispatch Trip Plan is received.
Access the WORKFLOW program
-
You can click the “View” button on the new Trip Plan notification pop-up to open Workflow with the Dispatch Trip Plan displayed.
-
Or, from the Omnitracs unit Home page (house icon), tap the right arrow key on the screen to go from through the list of programs until you see the “Workflow” program. It may be one or two screens over from the Home page depending on how many programs are loaded on your Omnitracs unit.
-
When lit up, it is active for you to use with your dispatch.
-
When not lit up, it is not activated and you should inform a dispatcher.
-
-
Symbols used within Workflow
-
The SHIPPER/INITIAL PICKUP Stop is indicated by
-
Intermediate PICKUP type stops are indicated by
-
Intermediate DROPOFF type stops are indicated by
-
The CONSIGNEE/FINAL DELIVERY stop is indicated by
-
When a TASK or STOP is completed, a check mark appears to the left of the Task
-
When an Arrival at a scheduled Stop Location occurs, “In Progress” arrows display on the right side of that Stop row on the Trip Plan tab
WORKFLOW Screens
TRIP PLAN SCREEN (Replaces your “Load Info” Message)
Displays your assigned Load/Dispatch Stops and Scheduled Appointment times
Stops are listed in the REQUIRED ORDER for completion.
-
“Info” button –Click to see high-level Load detail, such as Trailer ID, BOL #, Commodity Type, Weight, Pieces, Required Temperature (for refrigerated loads), etc.
-
“Details” button –Tap on a STOP Row, then click “DETAILS” to see the specifics about that Stop Location’s pickup or delivery
DETAILS TAB (Replaces your “Additional Info” message)
Displays the selected Stop location’s Address, Contact Information, and Shipment Details.
-
Use the Scroll bar on the right side of the screen to see all of the load information.
-
The “Info” button on the Details screen will display the Stop’s Directions and Loading/Unloading Instructions.
-
Click “Accept” to confirm the trip can be completed based on the appointment date/time, available hours, etc.
-
Click “Reject” if you cannot complete the trip and contact dispatch ASAP!
-
The load will be removed from the unit if Rejected.
-
TASKS TAB (Replaces the selection of Forms from the Messages program)
Displays the Tasks for that specific stop.
-
Shipper:
Intermediate Pickup Stops: Intermediate Delivery/Drop-off Stops:
-
Select and complete the associated form screens for each task on the Stop’s Task screen.
-
There are REQUIRED tasks (in BOLD print), and there are OPTIONAL tasks in case you need them (i.e., Report Delay and OS&D)
-
Bolded tasks for each stop must be completed in the correct sequence before you depart the location.
-
-
-
“Arrived” tasks auto-occur when the tractor enters the defined geofence of that location. You will be prompted to confirm arrival after entering the geofence of the location. The tractor must be idle for 1 minute in order for the Arrival prompt to be displayed. If the arrival time if after the scheduled appointment time, you will be prompted to enter a reason code and comment.
-
A “Confirm” message will pop-up for you to click on, to indicate that you have actually arrived for the scheduled Pickup/Dropoff/Delivery
-
-
If the “Arrived” task does not auto-occur, the location is either not geocoded or the latitude/longitude in LoadMaster is not in sync with the actual location.
-
If you’re not prompted to arrive, you will have to manually arrive by tapping on the Arrived task row, Click the “Select” button, then “Confirm”
-
-
Some of the fields on each Task that must be completed will display the pre-populated values from the actual order (e.g., trailer ID, BOL, etc.) when the Task is opened.
-
If the value is correct, continue to the next field.
-
If it is incorrect, clear out the pre-populated value and enter the actual value. (i.e. Planned pickup amount = 10000 lbs, but actual is 15000 lbs)
-
-
The “Depart” task will auto-occur when the tractor exits the defined geofence of that location.
-
If a Pick/Drop done at the same location, you will have to manually depart by tapping on the Departed task row, Click the “Select” button.
-
As Tasks are completed, a green checkmark appears to the left of the Task:
-
Once all the Tasks are completed for the stop, a green checkmark will appear to the right of the Stop row:
-
The stop is considered complete when a green checkmark appears to the right of each Stop row:
-
SEND MSG TAB is where you will find additional/optional forms you can send to Dispatch, much like your MESSAGES program “Compose” list. For example, Report Accident, Report Breakdown, Empty to Location, etc.
Pre-Plan Processing
-
While you’re in progress on a load, dispatchers can zmit your next Pre-Plan. This gives you a head’s up on your next load.
-
You will not be able to begin a Pre-Plan. The Pre-Plan will become a Trip Plan when the current load is complete.
-
The Order number, Shipper, and Delivery locations are displayed on the Pre-Plan tab.
-
“Info” button –Click to see high-level Load detail.
-
“Details” button – Click “DETAILS” to see the specifics about the Pre-Plan.
-
Use the “Arrow” to view details on subsequent stops.
-
The “Info” button on the Details screen will display the Stop’s Directions and Loading/Unloading Instructions.
Although the “Tasks” tab is available, you can only view the Tasks for each stop. You will not be able to select any of the Tasks.